Add a transaction
Enter a purchase, deposit or other transaction by hand with the Add row, or with the Add transaction form on a phone.
Updated November 10, 2026
Enter a purchase, deposit or other transaction yourself with the Add row, the first row of the Transactions list. On a phone, the Add transaction form takes its place. You can open either one from any page.
Add a transaction
These steps are for a computer. On a phone, use the steps under "On a phone" below.
- Select Transactions in the sidebar.
- Choose what the list shows with the account button at the top left: All accounts, On-budget, Off-budget or one account.
Select Add transaction in the list toolbar. The Add row opens directly under the column headings and stays there while you scroll. If a long split makes it taller than half the list, it scrolls with the list instead. The cursor is in Date. Under the row, a strip holds Cancel and Add.
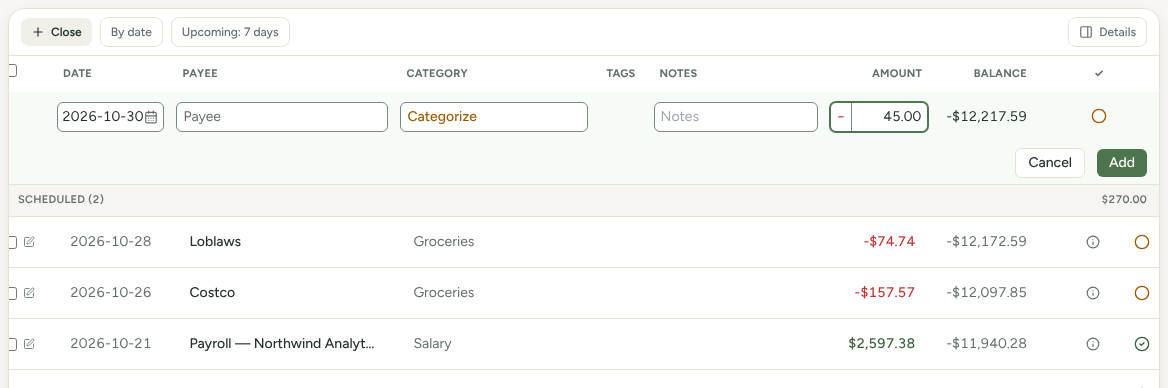
- If the list shows more than one account, the row has an Account field. Choose the Account before the payee and category. It lists the open accounts in the list you are viewing, and it starts on the account you last added a transaction to in this browser. If that account isn't in the list, it starts on the first one.
- Check the date. It starts as today. Enter a date in the same format as the dates in the list, or select the calendar button in the box to choose one. If the box can't read the date, it gets a red border and Add is dimmed until you correct it.
- Choose a Payee. Select the box to open its list and choose a name, or enter a few letters and press Enter to choose the highlighted name. For a new name, enter it and press Enter or Tab, or choose Create “name”. The payee is created when you save.
- Choose a category in the box that reads Categorize, the same way. Categories other than income and off-budget ones show their Balance from the Budget page for the month of the date in the row. To create one, enter a new name and choose Create “name”, then choose a group for it. Text that matches no category goes back to what the box held when you leave it. If a hidden category in that group already has the name, the group shows a line instead of a button: "Name" is hidden. Unhide it on the Categories page. No second category is created.
- Enter Notes if you want them.
- Enter the amount in Amount. The button on the left of the box shows − for money out or + for money in, and starts on −. Select it to change direction. You can also enter the sign:
-45sets − and+45sets +. A number with no sign leaves the button as it is. - Select Add in the strip. You can also press Enter in the Date, Account, Notes or Amount box. In Payee, Enter first chooses the highlighted entry, or the text you entered as a new payee. In Category, it first chooses the highlighted category. On text that matches no category, it skips Create “name” and goes straight to the group choice: "Add “name” to which group?" Choose a group to create the category. Press Enter again to save. If nothing in the box has changed, Enter saves at once.
On a computer, each field sits under its column. Tags has no field in the row. Add tags after you save the transaction. See Tag transactions.
If Add is dimmed, the left side of the strip says why, for example "Enter an amount before saving". Press Enter in Date, Account, Payee, Category, Notes or Amount and the cursor moves to the field that needs attention: Date if the date can't be read, Amount if it is empty or not a number, otherwise the amount of the split line to fix. In a split line's amount, Enter works differently: it adds a line, or moves to the next line's category. See Split a transaction. If the save fails, the strip shows "Could not add the transaction. Try again." and the row keeps what you entered.
The row stays open and clears so you can enter the next transaction. The cursor goes back to Date. The Account and the date stay as you set them, so you can enter several transactions from one day in a row. The cleared mark goes back to where it started. Select Cancel, select Close in the toolbar, or press Esc when you are done. Each closes the row and discards anything you entered but did not save. If a list is open, Esc closes the list first and the row on the next press. The next time you open the row, the date starts as today.
To move money between your own accounts, open the Payee list and choose Make a transfer. See Record a transfer between accounts. To divide a purchase among categories, open the Categorize list and choose ⑂ Split this transaction. See Split a transaction. On an off-budget account, the row shows — in place of a category and has no transfer or split.
Mark it cleared and read the balance
The circle at the right end of the row is the cleared mark. Select it to switch between uncleared and cleared. A circle with a check means cleared. The mark starts as your Settings choice (see "What a new transaction starts as" below), and it goes back to that after each save.
When the list shows one account with no search or filter, the row also has a cell under Balance. While Amount is empty, it shows the account's balance now. Once you enter an amount, it shows the balance after the new transaction. It follows the amount, the direction and the date. For a date in the past, it is the balance at that point in the list. Once there is an amount, the cell is empty when the amount isn't a number, when the date can't be read, or when the date is older than every transaction on the page you are viewing. On a page after the first, it is also empty when the date is newer than every transaction on that page. In Grouped view, the cell follows the section the transaction will join, so it changes with the cleared mark. A cleared transaction joins the Cleared section, which starts from the Cleared total, so with Amount empty the cell shows that total. An uncleared one joins the Uncleared section, which starts from the account's balance and runs on into the Cleared section. The two rules about the page apply to the Cleared section and to lists that aren't grouped. The Uncleared section is listed in full on the first page, so there an uncleared transaction always gets a balance, with one exception: for a section cut off at 500 transactions, a date older than all 500 shown leaves the cell empty. On later pages the cell is empty for an uncleared transaction. Other lists have no Balance column and no cell.
Use the keyboard
- Tab moves through the row in this order: Date, Account (when shown), Payee, Category, Notes, Amount, the cleared mark, Cancel and Add. In Payee, Tab first chooses the highlighted entry, or the text you entered as a new payee. In Category, it chooses the highlighted category; text that matches no category goes back to what the box held. Shift + Tab goes back.
- Esc closes an open list, then the row. In Date, Esc on text that can't be read puts back the last date that could be read and keeps the row open.
- In Category, ↓ and ↑ also stop on ⑂ Split this transaction. Enter on it starts a split.
- Enter or Space on the cleared mark switches it.
Keyboard shortcuts lists every key in the Add row.
On a phone
On a phone, Add opens a form that covers the Transactions page. Select Add in the list toolbar, or in the top bar on any other page. The cursor is in Amount.
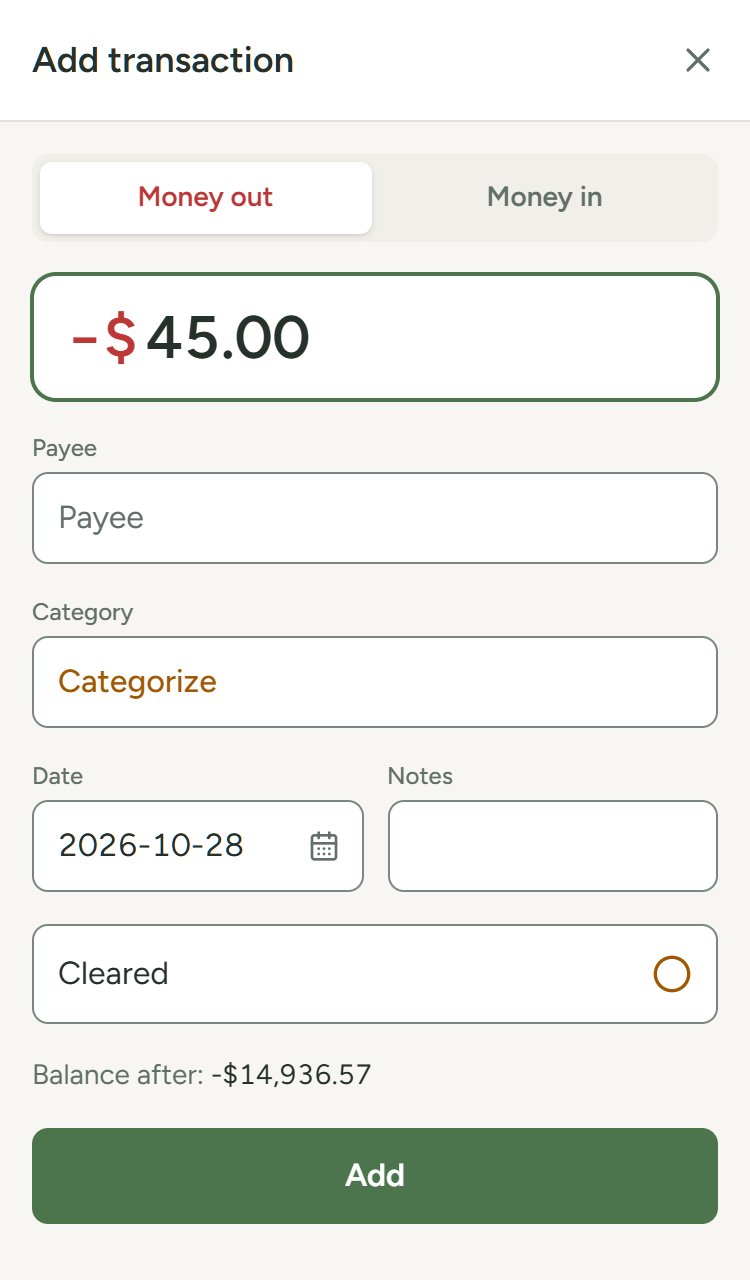
- Select Money out or Money in at the top. Money out is selected first.
- Enter the amount in Amount. A −$ or +$ in front of it shows the direction. You can also enter the sign:
-45chooses Money out and+45chooses Money in. - If the list shows more than one account, choose an Account. It starts on the account you last added a transaction to in this browser.
- Select Payee to open a sheet from the bottom of the screen. Choose a name, or select Make a transfer to choose another account. The keyboard stays down until you select the search box. Select the X at the top of the sheet to leave without choosing.
- Select Category the same way. The sheet starts with ⑂ Split this transaction. Categories other than income and off-budget ones show their Balance from the Budget page for the month in Date.
- Check Date and Notes. They sit side by side. The date starts as today.
- Select Cleared to switch the mark. It starts as your Settings choice.
- Select Add.
When the list shows one account with no search or filter and Amount has a number, a line under Cleared shows Balance after the new transaction. The line is left out in the same cases as the Balance cell above, for example when the date is older than every transaction on the page. If Add is dimmed, the reason shows under it.
After you select Add, the form stays open and clears for the next transaction. A line under the header reads, for example, "Added Costco, −$68.93". It disappears after a few seconds. The date and the Account stay as you set them, and the cursor goes back to Amount. Select the X at the top right, or use your phone's back button or gesture, to close the form and return to the list. If the form opened when the app started, for example from the installed app's shortcut, Back leaves the page; use the X. A form with a split or a transfer works as described in Split a transaction and Record a transfer between accounts.
Open the Add row from another page
- On a phone, select Add in the top bar. The top bar doesn't show it on Transactions, which has its own Add button in the list toolbar.
- On a computer, press N when you are not typing in a field, or select the round Add button on the Home or Accounts page.
These open Transactions on All accounts with the Add row open (on a phone, the Add transaction form). On Transactions, N opens the Add row of the list you are viewing. The installed app's Add transaction shortcut and an old bookmark of the Add transaction page open the same place.
Fill in the category from your rules
When you choose a payee and Categorize is still empty, the row looks for a category. It checks your rules first. If no rule sets one and Auto categorization is on in Settings, it uses the category you use most with that payee. It fills Notes too when a rule sets notes and the field is empty. The row looks again when you leave the amount or date field, switch the direction, choose another account or switch the cleared mark, because a rule can depend on them.
The row never changes something you already chose or entered, and it doesn't fill in a split or a transfer. You can change what it filled in before you select Add.
If Categorize is empty, or still shows what the row filled in, when you select Add, your rules run on the transaction as it's saved, with its final amount, date, account and cleared mark. They run the same way as on a bank transaction. A rule that splits the amount splits the new transaction, and a rule that changes the payee or notes applies too. A rule that sets cleared replaces the mark you chose. If neither a rule nor your payee history gives a category, the transaction is uncategorized. A category you chose yourself is saved as you chose it, and no rule runs on it.
What a new transaction starts as
A transaction you add yourself starts as reviewed, so it isn't in To review. It starts as uncleared. To change that for every new transaction, turn off New transactions you enter by hand start as Uncleared in Settings, under New transaction defaults. To change it for one transaction, switch the cleared mark before you save. In a Balance-only account, a transaction you add starts Cleared and reviewed and never changes the account's balance. See Transactions or Balance only for a bank account.
A split starts as To review, and each of its lines counts once in the To review count, even a line you gave a category. A transfer starts as To review on both sides. The cleared mark you set applies to the side in the account you chose. The other side starts as your Settings choice says.
To remove a transaction you added a moment ago, select Undo in the list toolbar. To put it in another account, see Edit a transaction.